Kya aap janna chahte hain ki Ubuntu Server par WordPress install kaise kare. Is post me aap sikhenge ki Ubuntu Server par LEMP stack install karne ke baad WordPress install kaise kar sakte hain. Aapko main har step bahut hi aasan shabdon me bataunga jisse aap aasani se Ubuntu server par wordpress install kar sakte hain.
Ubuntu Server par WordPress install karne se pehle apko LEMP stack ( Linux, Nginx, MySQL, PHP) install karna padta hai jisse apke server par base taiyar karta hai jis par aap apne software install kar sakte hain. Aur is tarah aap apne website ko run karane ke lie wordpress install kar sakte hain. WP best content management system hai jisme blogging karna bahut hi aasan hai. Isme har work ke lie alag alag plugins free me milte hain aur sath hi responsive themes bhi install kar sakte hain jisse apne blog website ke look ko attracting bana sakte hain.
WP me aap PHP Processing ke sath MySQL backend ka use kar ke flexible blogs aur website easily setup kar sakte hain. Is post me main apko bataunga ki aap kaise wordpress install kar sakte hain jisme LEMP stack ( Linux, nginx, MySQL aur PHP ) Ubuntu ke server par pehle se installed ho.
To chaliye jante hain ki wordpress install karne se pehle apko kis baaton fulfill karna hai.
Ubuntu 16.04 ke Server Par Installed LEMP ke sath WordPress Install Kaise Kare
Ubuntu server me WP ka installation shuru karne se pehle kuch requirements hain jise pura karna jaruri hai. Kyuki iske bina aap WP succesfully install nahi kar sakte. WordPress install karne se pehle in tasks ko complete kar le.
1.Signup on Digital Ocean & Create a Droplet Server on Digital Ocean
Digital ocean me droplet create karte hain jo ki VPS ka kaam karta hai matlab ek virtual private server create karte hain. Aur isi server par sabhi softwares ko install karte hain aur files ko store bhi karte hain.
2. Install a LEMP Stack
WordPress kisi server par directly work nahi karta balki iske lie web server, ek database aur PHP ki jarurat hoti hai jisse ki WP correctly function kar sake. So LEMP stack ( Linux, Nginx, MySQL, Aur PHP) install kar ke in requirements ko fulfil kar sakte hain. LEMP stack install karne ke lie is guide ko follow kare.
3. Secure Your site with SSL
WP dynamic contents ko serve karta hai aur user authentication aur authrization ko handle bhi karta hai. TLS/SSL aisi technology hai jo apko allow karti hai ki aap apne website ke traffic ko encrypt kar sakte hain ki aapka connection secure hai. Aap apne site ko https me convert kar sakte ho iske lie aap let’s encrypt SSL aur self-signed SSL prayog kar sakte ho.
Jab ye sara setup complete ho jaye to aap wordpress install karna shuru kar sakte ho.
- DigitalOcean Se Cloud Hosting Kaise Kharide – 2 Months Free Hosting
- DigitalOcean Server Me Putty Se Login Kaise Kare With SSH Key
How to Install WordPress On Ubuntu 16.04
Ab aage main apko step by step method commands aur screenshot ke sath bataunga jiko ache se follow kar ke easily wordpress install kar sakte hain. Main apse bas ye kehna chaahunga ki post ko pura follow kare ek bhi step bypass na kare. Agar aap properly steps ko follow karenge to apko koi bhi problem nahi hogi.
Step 1. Create a MySQL Database and User for WordPress
Ye step installation ka pehla step hai jisme aap taiyar honge wordpress install karne ke lie. Site aur User information ko store aur manage karne ke lie WP MySQL database ka use karta hai. Humne MySQL pehle hi install kar rakha hai ab hume MySQL database banane ki aur WP chalane ki lie ek user ki jarurat padegi.
MySQL me login karne ke lie is command ka use kare.
♦ mysql -u root -p
Ab aapne MySQL install karte waqt jo password setup kiya tha use kar ke login kare. Sabse pehle hum ek seperate database create karenge jisse hum WP ko control kar sake.
Aap is database ka naam apni marji se rakh sakte ho lekin hum yahan wordpress naam se hi database create karenge. Isse ye hamare aasan hoga. Aap is database ko create karne ke is command ka use kare
mysql> CREATE DATABASE wordpress DEFAULT CHARACTER SET utf8 COLLATE utf8_unicode_ci;
Note: MySQL ki har statement ke last me semi colon (;) hona chaiye . Agar error aaye to check kare har line ke last me semi colon hai ya nahi.
Humne ek MySQL database bana liya hai to ab hume jarurat hai ek user create kane ki jisse ki hum baki ka process pura kar sake.Yahan par user create karne ke lie username me main wordpressuser aur password me password rakh raha hu.
Aap apni suvidha ke anusar apna username aur password rakh ke aage badh sakte hain. User create karne ke lie niche die command ko type kare.
mysql> GRANT ALL ON wordpress.* TO 'wordpressuser'@'localhost' IDENTIFIED BY 'password';
Ab aapne wordpress install karne ke lie specially ek database aur ek user create kar liya hai. Apko ab previleges ko Flush karna padega taki MySQL jaan sake usme me changes aapne abhi kiya hai.
mysql> FLUSH PRIVILEGES;
Ab aapko MySQL se bahar jana hai iske lie ye command use kare.
mysql> EXIT
Step 2: Adjust Nginx’s Configuration to Correctly Handle WP
Aage apko Nginx server block files me kuch minor adjustments karne honge. Sudo privileges ke sath default server block file ko open kare. Iske lie ye command use kare
♦ sudo nano /etc/nginx/sites-available/default
Main server block ke andar apko kuch location blocks add karne ki jarurat hai. Jab aap wordpress install karenge to kuchh request jinko apko jarurat nahi padegi use pehle hi block kar dena hai. Isilie aap in requests /favicon.ico aur /robots.txt dono ko exact matching location blocks banakar block kar de.
In dono location blocks use karne ke lie niche die gae lines ko server ke andar add kar le.
/etc/nginx/sites-available/default
server {
. . .

location = /favicon.ico { log_not_found off; access_log off; }
location = /robots.txt { log_not_found off; access_log off; allow all; }
location ~* .(css|gif|ico|jpeg|jpg|js|png)$ {
    expires max;
    log_not_found off;
}
. . .
}
Ab apko location/ block ke andar try_files list ko adjust karna hoga taki default option ke roop me 404 error rreturn hone ki bajay request arguements k use kar ke control ko index.php file me paas kiya ja sake.
Ye sari lines ko adjust karne par apko is tarah ka look dekhne ko milega.
/etc/nginx/sites-available/default
server {
. . .
location / {
#try_files $uri $uri/ =404;
try_files $uri $uri/ /index.php$is_args$args;
}
. . .
}
Jab ye sari changes properly complete ho jaye to ise save kare aur close kar le. Ab humne jo changes kiye hain unme syntax error check karne ke lie is command ka use kare.
♦ sudo nginx -t
Agar isme koi error na aaye to is command se Nginx ko restart kar le.
♦ sudo systemctl reload nginx
Step 3: Install Additional PHP Extensions
Jab hum LEMP stack ki setting karte hain to hume PHP ko MySQL se communicate karane ke lie bahut kam extensions ki jarurat hoti hai. WP aur isme use hone wale plugins ko additional PHP extensions ki jarurat padti hai.
Hum is command ka use kar ke kuch sabse jyada Popular PHP extensions wordpress me use karne ke lie download aur install kar sakte hain.
♦ sudo apt-get update
♦ sudo apt-get install php-curl php-gd php-mbstring php-mcrypt php-xml php-xmlrpc
Note: WP ke har plugins ko alag alag requirements ki jarurat padti hai. Kuch plugins ko additional PHP ki requirements ko install karne ki jarurat hoti hai Apne plugins ko install karne se pehle uske PHP requirements ke bare me jaan le. Agar wo available hain to un ko install kar ne ke lie apt-get ka use kar sakte hain.
Jab aap extensions ko install karna pura kar le uske baad PHP-FPM process ko restart kar le . Restart karne se jo extension download kie hue wo properly work kar sake iske lie is command ka use kare.
♦ sudo systemctl restart php7.0-fpm
Itna work pura karne ke baad ab bari hai wordpress installation shuru kar ne ki.
Step 4: Download WordPress
Ab jabki server software properly configure ho chuka hai to hum WordPress download and install kar sakte hain. Security purpose ke lie ye recommend kiya jata hai ki WP ke naye version ko hi install kare.
WordPress download aur configure karne ke lie is command ka use kare.
♦ cd /tmp
♦ curl -O https://wordpress.org/latest.tar.gz
Ab compress file ko extract kare taki WordPress directory structure create ho jae.
♦ tar xzvf latest.tar.gz
Hum in files ko root momentarily me move karenge . Lekin move karne se pehle hum configuration file wahan copy karenge jahan se WordPress ise read kar sake.
♦ cp /tmp/wordpress/wp-config-sample.php /tmp/wordpress/wp-config.php
Ab Hum upgrade directory bhi create kar sakte hain taki WordPress ko run karne ke lie permission issue face na karna pade. Directory banane ke lie is command ko use kare.
♦ mkdir /tmp/wordpress/wp-content/upgrade
Ab hum sabhi directory ke sabhi contents ko hamare document root me copy kar sakte hain. Hamare permissions properly maintained rahe iske lie hum -a flag ka use karenge. Source directory ke last me hum ek dot (.) ka use karenge jo ye indicate karta hai ki directory ke andar ke sare contents aur hidden files bhi copy ho jane chahiye.
$ sudo cp -a /tmp/wordpress/. /var/www/html
Step 5: Configure the WordPress Directory
Isse pehle ki hum Web-base WP ka setup kare, hume WordPress directory me kuch items me adjust karne ki jarurat hai.
Adjusting the Ownership and Permissions
In sab me sabse badi chiz jo hume setup karni hai wo hai reasonable file ke lie permissions and ownership ki setting. Regular user ke roop me hum hume itna access dene ki jarurat hoti hai jisse user ko jab chahe tab files aur directory me change kar sake taki server correctly function kar sake.
Waise default username root hota hai. Iski shuruat hamare username ko document root ke sabhi files par ownership assign karne se shuru karte hain. Yahan hum wasimsrk ka use karenge username ki jagah. Aap apne lie khud ki pasand ka username decide kar lo sudo user ke roop me.
Humlog group ownership ko www-data group ke sath assign karenge.
♦ sudo chown -R wasimsrk:www-data /var/www/html
Ab hum document root ke har diretory me setgid bit set karenge. Isse jitni bhi nayi files in directories ke andar create ki jaaengi wo sari parent directory ke andar line up hoti jati hain serial se. Aur hume primary group banane ke jarurat nahi padti hai.
Isse hum sure hote hain ki jab bhi koi naya file create karte hain is directory me web-server ke paas fir bhi group ownership is ke upar rahega.
WordPress install karne me har directory ke andar setgid bit set karne ke lie ye command type kare.
♦ sudo find /var/www/html -type d -exec chmod g+s {} ;
Ab yahan kuch permission ko hum yahan adjust karenge. Pehle hum wp-content directory ko group write access denge taki web interface me hum plugin aur theme ko change kar sake.
♦ sudo chmod g+w /home/runcloud/webapps/khabarvimarsh/wp-content
Isi process ko aage badhate hue hum 2 aur directories ko web-server acces denge jo niche die gae hain.
♦ sudo chmod -R g+w /home/runcloud/webapps/khabarvimarsh/wp-content/themes
♦ sudo chmod -R g+w /home/runcloud/webapps/khabarvimarsh/wp-content/plugins
Kuch plugins aur procedure me additional setting ki jarurat hoti hai.
Setting up the WordPress Configuration File
WordPress configuration file me aur bhi kuch change karne hain jisme ab hum WordPress ke main configuration file me change karenge.
Jab ye file open hoga to sabse pehle hume kuch secret keys ko adjust karna hoga taaki hamare installation ko security mil jaae. WP khud hi secure values ko generate karta hai jiske lie hume mehnat karne ki jarurat nahi padti. Ye values secure hote hain jinhe hum easily use kar sakte hain.
WordPress se secure values nikalne ke lie hum ye secret key generator us karenge.
♦ curl -s https://api.wordpress.org/secret-key/1.1/salt/
Aapko unique values wapas milega jo is tarah dikhai dega.
Warning:
Unique values aap har baar generate kare. Yahan ke values ko copy na kare.
Output
define('AUTH_KEY', '1jl/vqfs<XhdXoAPz9 DO NOT COPY THESE VALUES c_j{iwqD^<+c9.k<J@4H');
define('SECURE_AUTH_KEY', 'E2N-h2]Dcvp+aS/p7X DO NOT COPY THESE VALUES {Ka(f;rv?Pxf})CgLi-3');
define('LOGGED_IN_KEY', 'W(50,{W^,OPB%PB<JF DO NOT COPY THESE VALUES 2;y&,2m%3]R6DUth[;88');
define('NONCE_KEY', 'll,4UC)7ua+8<!4VM+ DO NOT COPY THESE VALUES #`DXF+[$atzM7 o^-C7g');
define('AUTH_SALT', 'koMrurzOA+|L_lG}kf DO NOT COPY THESE VALUES 07VC*Lj*lD&?3w!BT#-');
define('SECURE_AUTH_SALT', 'p32*p,]z%LZ+pAu:VY DO NOT COPY THESE VALUES C-?y+K0DK_+F|0h{!_xY');
define('LOGGED_IN_SALT', 'i^/G2W7!-1H2OQ+t$3 DO NOT COPY THESE VALUES t6**bRVFSD[Hi])-qS`|');
define('NONCE_SALT', 'Q6]U:K?j4L%Z]}h^q7 DO NOT COPY THESE VALUES 1% ^qUswWgn+6&xqHN&%');
Generate hue unique codes ko copy kar le jise hum directly configuration file me paste karenge.
To ab hum Configuration file ko open kar lete hain.
♦ nano /home/runcloud/webapps/khabarvimarsh/wp-config.php
Ab yahan par us section ko find kare jahan apko is tarah se dummies values dekhne ko milenge. Iska look is tarah ka dikhai dega.
/home/runcloud/webapps/khabarvimarsh/wp-config.php
. . .

define('AUTH_KEY', 'put your unique phrase here');
define('SECURE_AUTH_KEY', 'put your unique phrase here');
define('LOGGED_IN_KEY', 'put your unique phrase here');
define('NONCE_KEY', 'put your unique phrase here');
define('AUTH_SALT', 'put your unique phrase here');
define('SECURE_AUTH_SALT', 'put your unique phrase here');
define('LOGGED_IN_SALT', 'put your unique phrase here');
define('NONCE_SALT', 'put your unique phrase here');
In dummy lines ko delete kare aur jo unique values apne copy kiya tha use yahan paste kar de.
/home/runcloud/webapps/khabarvimarsh/wp-config.php
. . .

define('AUTH_KEY', 'VALUES COPIED FROM THE COMMAND LINE');
define('SECURE_AUTH_KEY', 'VALUES COPIED FROM THE COMMAND LINE');
define('LOGGED_IN_KEY', 'VALUES COPIED FROM THE COMMAND LINE');
define('NONCE_KEY', 'VALUES COPIED FROM THE COMMAND LINE');
define('AUTH_SALT', 'VALUES COPIED FROM THE COMMAND LINE');
define('SECURE_AUTH_SALT', 'VALUES COPIED FROM THE COMMAND LINE');
define('LOGGED_IN_SALT', 'VALUES COPIED FROM THE COMMAND LINE');
define('NONCE_SALT', 'VALUES COPIED FROM THE COMMAND LINE');
Ab aage hume database connection setting ke file ke shuru me mdoify karne ki jarurat hai. Apko is file me database name, database user aur password ko adjust karne ki jarurat padegi jise humne MySQL ke sath configure kiya tha.
WP ke andar themes aur plugins install karne aur unhe update karne ke lie permission to write dena padega warna ise karne per Failure message ayega.
Is setting ko hum databse setting ke niche add kar sakte hain ya fir need ke nusar bhi file me set kar sakte hain.
/home/runcloud/webapps/khabarvimarsh/wp-config.php
. . .

define('DB_NAME', 'wordpress');

/** MySQL database username */
define('DB_USER', 'wordpressuser');

/** MySQL database password */
define('DB_PASSWORD', 'password');

. . .
Yahan par (;FS_METHOD’, ‘direct’); define karna hai. Jab apka kaam finsih ho jae to baad me is file ko Save kare aur file ko Close kar le.
Step 6: Complete the Installation Through the Web Interface
Ab hamara server ke andar ka confguration complete ho chuka hai aur web interface ke dwara ab hum installation complete karenge.
Simply is process ko pura karne ke lie web browser apne server ip address ko open kare.
https://server_domain_or_IP
Yahan aap apne pasand ka language select kare aur Continue par click kar le..
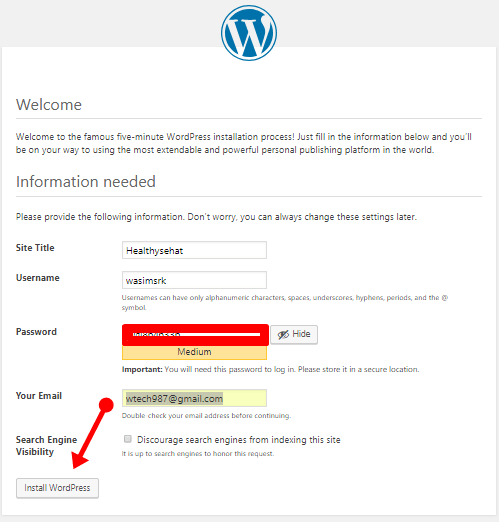
Ab aap apne WordPress install karne ke main setup tak pahunch chuke ho. Ab apko is tarah se is box me informaation ko fill kare.
- Site Title : Apne blog or website ka naam isme add kare.
- Username: Isme aap apne wordpress ke login ke lie username set kar le.
- Password: Apne WP me login ke lie password bhi set kare.
- Email Address: Apni site ke lie ek email id bhi isme add kare
- At last Install wordpress par click kare.
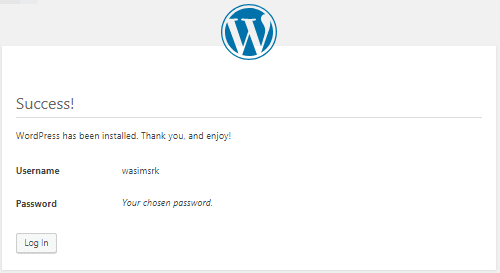
Ab apka wordpress completely install ho chuka hai aur ab aap login page par aa chuke hain. yahan apne Login ke lie username aur password enter kare aur login par click kare.
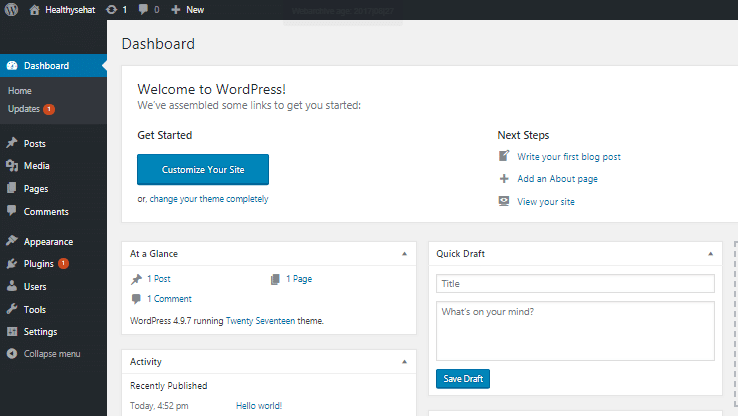
Finally aap apne WP ke dashboard me enter kar chuke ho. Is tarah aapne apne server me Successfully wordpress install kar liya hai .
Upgrading WordPress
Aapko hamesha WP me themes aur plugin ke updates milte rehte hain. Lekin currently permission ke sath aap updates install nahi kar sakenge.
Isko permission allow karne ke lie aap niche die gae command ka use kare.
♦ sudo chown -R www-data /var/www/html
Ab aap WordPress dashboard me jakar apne updates ko complete kar sakte hain. Iske baad apni site ki security ke lie permission ko disallow kar sakte hain. Jiske lie is command ka use kare.
♦ sudo chown -R root /var/www/html
Jyada behtar ye hai ki aap apne updates complete karne ke baad permission ko band kar de. Is tarah aapka WordPress pura ready hai aur blog bana ke use kar sakte hain. Regularly apne wordpress par login karne ke lie https://server_ip_address_or_domain_name/wp-admin ka use kare.
Conclusion
Doston ab aap samajh gaye honge ki Ubuntu Server par wordpress install kaise kar sakte hain. To friends aap ne aaj ke is post me successfully wordpress ko Ubuntu 16.04 with LEMP stack ( Linux, Nginx,MySQL, PHP) install kar liya hai. Agar aapko ye post useful laga ho to ise apne friends ke sath facebook,twitter,google plus, instagram me share kare.


Thank you so.much for your comment.
BAHUT HI BADHIYA POST HAI SHARE KARNE KE LIYE DHANYAWAD
Ubuntu me installation karna kafi aasan hai
i did. thanks alot sir
please tell me how can i improt my data from other wordpress to this
9993697276
deelip jaiswla